Intro
How To Make Sennheiser Cable Xlr, Are you looking to elevate your audio setup with a custom-made Sennheiser cable XLR? In this comprehensive guide, we will walk you through the step-by-step process of creating your own high-quality cable to enhance your audio experience. Whether you are a tech enthusiast or simply want to upgrade your home technology, this guide is perfect for you. Let’s dive into the world of DIY audio cables and unlock the potential of your sound system.
Understanding the Importance of XLR Cables in Audio Quality
XLR cables stand as the backbone of pristine audio output, bridging the gap between mediocre sound and professional-grade acoustics. These cables are engineered for balanced signal transmission, a feature that mitigates the intrusion of external interference and unwanted noise. Such a capability ensures that the sound traveling from your microphone or instrument to your sound system retains its clarity and integrity, free from the degradation common in unbalanced connections. This characteristic of XLR cables is not merely a technical advantage; it’s a transformative element that elevates the audio experience. By integrating XLR connections into your setup, you embrace a world where every note and word is conveyed with unmatched clarity, allowing you to capture and reproduce sound in its most authentic form. This is why understanding and utilizing XLR cables is pivotal in crafting an audio environment that mirrors professional standards.
Gathering the Necessary Tools and Materials
Embarking on this journey to create your own Sennheiser cable XLR, the first crucial step involves assembling your toolkit and materials. This requires precision and a bit of preparation. You’ll need the backbone of this project – a Sennheiser cable. Then, gather XLR connectors, one male and one female, to form the endpoints of your creation. A wire stripper is essential for unveiling the wires that will intertwine with your connectors. A soldering iron and solder will act as the binding force, ensuring a strong, lasting connection. Heat shrink tubing will provide the necessary insulation and protection for your soldered connections. Lastly, arm yourself with a cable tester to validate the fruit of your labor. This compilation of tools and materials is the foundation on which you’ll build a cable that not only carries sound but does so with unparalleled clarity and efficiency.
Preparing Your Cable for the Transformation
Initiating the process, begin by determining the length your Sennheiser cable needs to be, factoring in a bit of extra length for final adjustments. With precision, employ the wire stripper to peel back the outer layer of your cable, revealing the inner sanctum where the magic of sound transmission occurs. You’ll find a trio of wires awaiting your careful attention. Strip these wires back just enough to expose their cores, prepping them for the alchemy of soldering. This moment marks the transition from mere cable to a conduit of audio fidelity, setting the stage for the meticulous craftsmanship that will follow. It’s a pivotal step in your journey towards creating an audio experience that not only transcends the ordinary but does so with a personal touch.
Soldering the XLR Connectors: A Step-by-Step Approach
The heart of crafting your Sennheiser cable XLR lies in the precise art of soldering the connectors. It’s a process that demands attention to detail, so let’s break it down:
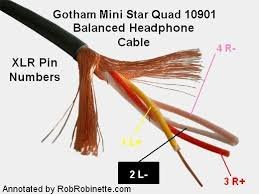
- Begin by familiarizing yourself with the pin configuration of your XLR connectors—pin 1 is ground, pin 2 is hot, and pin 3 is cold.
- Lightly coat the exposed ends of your wires and the corresponding pins on the XLR connectors with a thin layer of solder. This technique, known as ‘tinning,’ is crucial for making the soldering process smoother.
- Carefully solder the tinned wires to their respective pins on the connectors: the ground wire to pin 1, the hot wire to pin 2, and the cold wire to pin 3. Precision here is key to ensuring optimal signal transmission.
- Finish by applying heat shrink tubing over the connections. This not only insulates but also fortifies them against physical stress and environmental factors.
By methodically following these steps, you’ll ensure a robust and reliable connection, setting a solid foundation for superior sound quality.
Testing Your Newly Crafted Sennheiser Cable XLR
Once you’ve meticulously assembled your Sennheiser cable XLR, the next critical step is to ensure its functionality through rigorous testing. Arm yourself with a reliable cable tester, connecting one end of your handcrafted cable to the tester and following suit with the other end. This tool will serve as your impartial judge, revealing the integrity of your connections through its diagnostic feedback. A successful test will showcase a seamless signal flow, affirming your craftsmanship. Should you encounter any hiccups in signal transmission, view it as an opportunity to refine your skills further. Revisit your soldering and connections, applying the troubleshooting methods previously discussed. This phase is not just about validation but an integral part of the learning curve, bringing you one step closer to mastering the art of DIY audio excellence.
Troubleshooting Common Issues
Navigating through potential pitfalls with your Sennheiser cable XLR can be a straightforward endeavor when armed with the right approach. Should you find yourself facing signal loss or unwelcome interference, take a moment to meticulously examine each connection. Loose connections often lie at the heart of such issues. Next, turn your attention to the solder joints, scouting for signs of cold soldering, which can compromise signal integrity. Additionally, confirming the correct pinout alignment on your XLR connectors is critical; an incorrect setup here can derail your audio experience. Addressing these focal areas with precision can swiftly rectify common setbacks, ensuring your cable performs at its optimal capacity.
Expert Tips for Perfecting Your Sennheiser Cable XLR
To elevate your Sennheiser cable XLR project from good to exceptional, consider these insights from seasoned professionals. Selecting premium materials is not just a choice but a commitment to audio purity and durability. When soldering, the finesse lies in maintaining your iron at an optimal temperature—too hot, and you risk damaging the delicate innards of your connectors; too cool, and your solder may not flow as intended. Additionally, a well-organized workspace facilitates not only a smoother workflow but also prevents potential mishaps that could compromise your cable’s integrity. Embrace these practices with the mindset of a craftsman, where every action is deliberate and every choice is made with the end goal of achieving flawless sound transmission. This attention to detail and dedication to quality will set your Sennheiser cable XLR apart, ensuring it stands as a testament to superior craftsmanship and sound excellence.
Expert Tips for Maintaining Your Sennheiser Cable XLR
To ensure your Sennheiser cable XLR remains in peak condition, heed these curated maintenance strategies. First, dedicate a designated space for storage, away from moisture and environmental hazards, safeguarding its structural and functional integrity. Regular inspections are paramount; address any signs of wear or corrosion on the connectors promptly to avert compromised sound quality. Embrace a gentle approach when handling your cable; avoid aggressive bends or twists that could inflict internal damage. Adhering to these guidelines not only prolongs the lifespan of your custom cable but also sustains the pristine audio experience it was crafted to deliver.
Achieving Professional Sound with Your DIY Sennheiser Cable XLR
By harnessing the power of your handcrafted Sennheiser cable XLR, you’re not just tweaking your audio setup; you’re unlocking a realm of sound quality that stands on par with the pros. The journey from soldering iron to sound system culminates in a deeply satisfying crescendo of cleaner audio, diminished interference, and a richness of sound that breathes life into every note and lyric. This isn’t just about replicating the performance of high-end commercial cables—it’s about surpassing it, bringing a personal touch of craftsmanship that’s tailored to the nuances of your setup. Your commitment to quality materials and meticulous assembly pays off in an auditory experience that’s both immersive and impeccably clear. As you plug in your DIY Sennheiser cable XLR, prepare to be greeted by an audio landscape where every detail is preserved, and every sound is elevated, truly achieving professional sound that echoes the hallmarks of audio excellence.
Maximizing Your Setup’s Potential with Your New Cable
With your freshly minted DIY Sennheiser cable XLR in hand, the journey towards audio excellence is just beginning. This isn’t merely about introducing a new component into your system—it’s about unleashing a symphony of possibilities that elevates every sonic encounter. Whether it breathes life into your studio recordings, adds clarity to your live performances, or enriches your home listening sessions, your custom cable stands as a testament to superior sound quality and resilience. The transition to using your handcrafted cable is not just a change; it’s an upgrade, a strategic move to unlock the latent potential of your audio equipment. Your dedication to crafting this cable not only reflects your commitment to achieving the highest fidelity in sound but also positions you to experience music and voice in their most pristine form. The true measure of this project’s success is witnessed in the depth and clarity of the audio it helps produce, transforming every listening moment into an experience of unparalleled richness.