Intro
How To Repair Sennheiser Microphone, If you’re a tech enthusiast who appreciates the quality of a Sennheiser microphone, you understand the frustration that comes with a malfunctioning device. Whether it’s due to wear and tear or an unexpected accident, knowing how to repair your Sennheiser microphone can save you time and money. In this guide, we will walk you through the step-by-step process of repairing your beloved microphone so you can get back to recording or performing without any interruptions.
Understanding Your Sennheiser Microphone’s Issue
Diving into the heart of your Sennheiser microphone’s malfunction requires a detective’s mindset. Begin by isolating the symptom that’s throwing a wrench in your audio experience. Is it producing a crackling sound, cutting out intermittently, or perhaps not capturing sound at all? This initial step is not just about identifying the problem; it’s about connecting with the intricacies of your device. Each symptom can lead you down a different repair path — from a simple cable swap to more involved internal repairs. Approach this step with patience and precision. By accurately diagnosing the issue, you set the stage for a repair process that is not just effective but efficient. Remember, the goal here isn’t just to fix a problem temporarily but to restore your Sennheiser microphone to its peak performance, ensuring that your technology continues to serve you without missing a beat.
Gathering the Necessary Tools for Repair
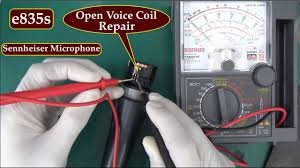
Embarking on the journey to mend your Sennheiser microphone is akin to preparing for a meticulous adventure. To ensure a smooth and efficient repair process, equipping yourself with the right tools is paramount. Essential to this mission are a precision screwdriver set, tailored to navigate the delicate components of your device, and a soldering iron, ready to mend any broken connections that await. A multimeter stands as your faithful ally, ready to unveil the mysteries of electrical continuity and component functionality. And, should the need arise to replace any parts, having the appropriate replacements on hand will streamline the process. This toolkit is not merely a collection of items but a gateway to restoring the harmony between you and your cherished technology. As you gather these instruments, consider the significance of each one, for they are the keys to unlocking the full potential of your Sennheiser microphone once more.
Step-by-Step Guide to Dismantling Your Microphone
Embarking on the delicate task of dismantling your Sennheiser microphone requires a steady hand and a focused mind. Your initial step involves carefully unscrewing the outer casing with a precision screwdriver, treating each movement with respect for the craftsmanship of your device. Upon lifting the veil of the outer shell, you will be greeted by the internal heart—the circuit board and the microphone capsule. With a gentle yet confident touch, detach any connections that tether these components together. This process is not merely about separation but understanding the layout and relationship between each part. As you navigate through this phase, maintain an organized workspace, allowing for an intuitive reassembly. Remember, this journey into the depths of your microphone is a pathway to not just repair but deeper understanding and connection with your technology.
Locating and Addressing the Fault
Upon the unveiling of your Sennheiser microphone’s internals, embark on a meticulous examination. With a discerning eye, scout for signs that betray the root of the malfunction—this could range from a frayed wire that whispers tales of wear to a solder joint that no longer holds its bond, signaling a breach in connectivity. Your journey here is twofold: first, to uncover these hidden adversaries that disrupt the harmony of sound, and second, to rectify them with precision. Employ your soldering iron to reaffirm loose connections, or, if a component has sung its last, ready a replacement that will restore the chorus. This phase is not just about repair; it’s an act of rejuvenation, breathing life back into your microphone, ensuring that its voice, once stifled, is clear and resounding once again. Navigate this process with the understanding that each action taken is a step towards the revival of your Sennheiser microphone’s pristine performance.
Reassembling Your Sennheiser Microphone
With the core issues adeptly addressed, the reassembly of your Sennheiser microphone begins. This phase is as critical as any, where precision and care are paramount. Start by reconnecting each component with the mindfulness of a craftsman, ensuring that every part finds its rightful place within the intricate ecosystem of your device. As you reintegrate the circuit board and microphone capsule, reflect on the unity you’re reinstating – a harmonious blend of technology and craftsmanship. The outer casing, once removed to reveal the inner workings, now returns, symbolizing not just the completion of the repair but the restoration of your microphone’s integrity. Fasten each screw with deliberation, mindful that your efforts are fortifying the microphone against future disturbances. This moment, while focused on the physical reassembly, is also about rekindling the connection between you and your Sennheiser microphone, setting the stage for a seamless return to the auditory adventures that await.
Testing and Ensuring Optimal Functionality Post-Repair
Once the reassembly of your Sennheiser microphone is complete, the final and crucial step is to ensure it functions as expected. Connect the microphone to your audio setup and proceed to conduct various tests. Record spoken words, varied pitches, and different sound levels to evaluate the microphone’s performance across a spectrum of audio inputs. Listen for clarity, absence of distortion, and consistency in sound capture. Adjustments may be needed if any anomalies are detected, signaling that your repair journey may require a bit of fine-tuning. This stage is about validating the precision of your repair work, making certain that your Sennheiser microphone is ready to deliver exceptional audio experiences once again.
Preventing Future Microphone Problems
To safeguard the longevity and efficiency of your Sennheiser microphone, a proactive approach to maintenance is essential. Engage in a regular routine of meticulous care, making this not just a task, but a ritual that ensures your microphone’s enduring performance. Key to this practice is the gentle, yet thorough, cleaning of your device, utilizing a soft, dry cloth to keep dust and particles at bay. Embrace the habit of inspecting your microphone for any signs of wear or potential damage, treating it not as a mere tool, but as a valuable asset in your technological arsenal. Store your microphone in environments that shield it from the extremes—be it the biting cold or the sweltering heat—to avert any adverse effects on its intricate components. By integrating these steps into your regular care regimen, you’re not just preventing future problems; you’re actively participating in the preservation of your Sennheiser microphone’s fidelity and functionality.
Preventative Maintenance Tips
Embracing a culture of proactive care for your Sennheiser microphone involves more than mere cleaning. Encase your technological companion in a protective cocoon when not in use to shield it from the environmental adversaries that seek to compromise its integrity. Be wary of the silent yet potent threats of extreme temperatures and moisture; such conditions are not allies to your device’s longevity. Further, a routine examination for loose connections can act as a sentinel against the creeping malaise of sound distortion. Vigilance in observing for wear and addressing it swiftly ensures your microphone remains a reliable conduit for your voice. This regiment of preventative maintenance is less about the avoidance of future nuisances and more a testament to the reverence held for the craftsmanship enshrined in your Sennheiser microphone, preserving its essence for the auditory quests that lie ahead.
Preventative Maintenance Tips to Avoid Future Issues
To forestall potential issues with your Sennheiser microphone, a meticulous approach to maintenance is crucial. Frequently examining the microphone for any loose parts is essential; a simple tweak can preempt unexpected sound distortions or loss of connectivity. Keep an eye out for any physical damage or signs of wear—these can be early indicators of deeper problems that could compromise your microphone’s performance. Addressing such issues early can be the difference between a minor repair and a major overhaul. Integrating these practices into your routine not only enhances the longevity of your device but also ensures its reliability as your technological ally. This proactive stance on maintenance is less about avoiding inconvenience and more about preserving the exceptional quality and performance that you’ve come to expect from your Sennheiser microphone.
Maintenance Tips to Prevent Future Issues
Cultivate a vigilant stance towards your Sennheiser microphone’s care to ensure its continued fidelity and robust performance. Implementing a routine inspection for signs of stress or strain on the device is paramount. This proactive surveillance extends beyond mere aesthetics; it delves into the operational heart of your microphone, ensuring every component functions in concert. Embrace a holistic maintenance approach that includes gentle cleaning to remove any particulate adversaries and secure storage to protect against environmental degradation. By adopting these practices, you’re not merely extending the life of your microphone; you’re honoring the intricate engineering behind it, guaranteeing that it remains a steadfast partner in your technological endeavors.